Friday
6 Must Know New Features of Adobe Illustrator CC
A new release of Adobe Illustrator has a lot of new features that will definitely make your work easier. Now it has become easier to manage text objects, we can automatically generate a corner tile for pattern brush and use bitmap images as brushes. Free Transform Tool has a new widget, which allows you to control the deformation of objects in a more intuitive manner. Adobe Illustrator CC has about 15 new features. The most significant ones, in my opinion, will be discussed in this review.
Touch Type tool
Touch Type Tool is designed to control the parameters of a single character of the text object. You can access it in the toolbar or in the Character panel.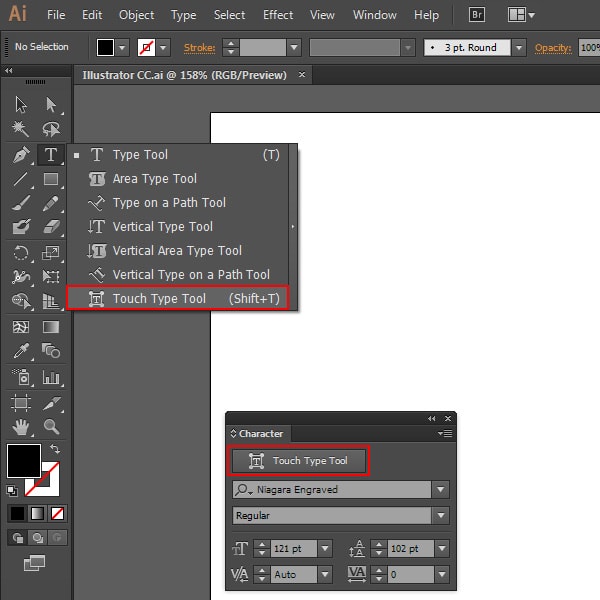
If we select one character with the help of this tool, you will see a few handles that serve as control elements.
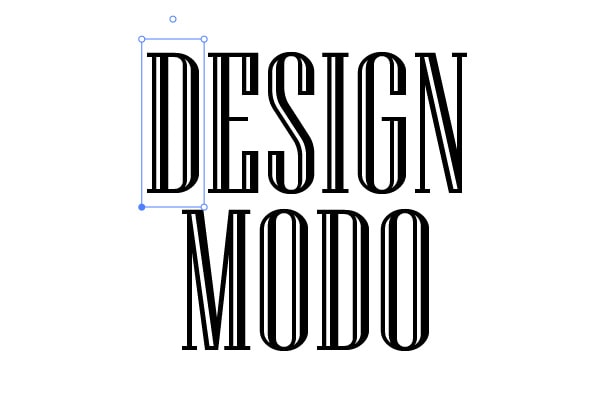
By moving the handles we can move the character in horizontal and vertical direction, change its width and height separately or proportionally, and change the inclination angle of the character. At the same time the rest of the text will adapt to the changes that were done.
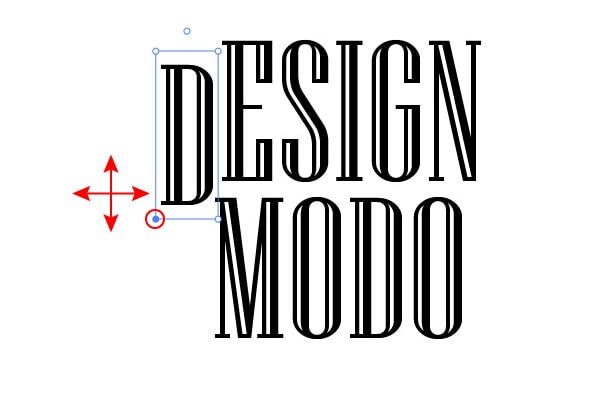
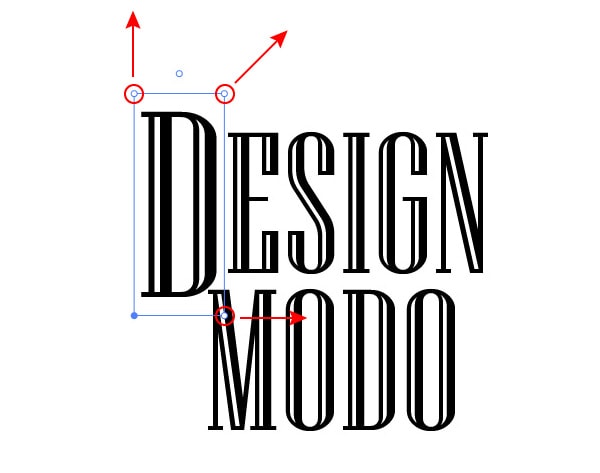
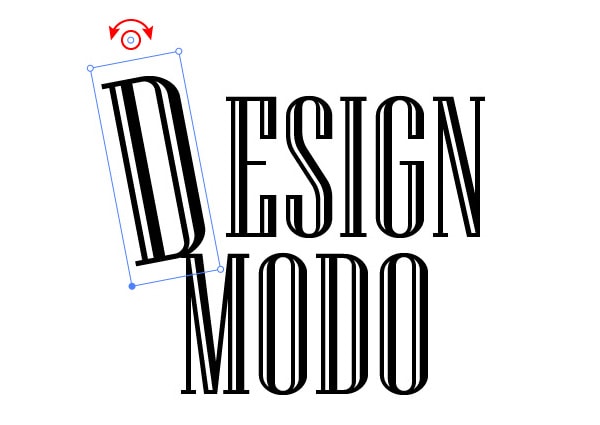
Of course, all the parameters of the character can be controlled the same as it was before in the Character panel, but the Touch Type Tool allows us to do this in a more intuitive manner.
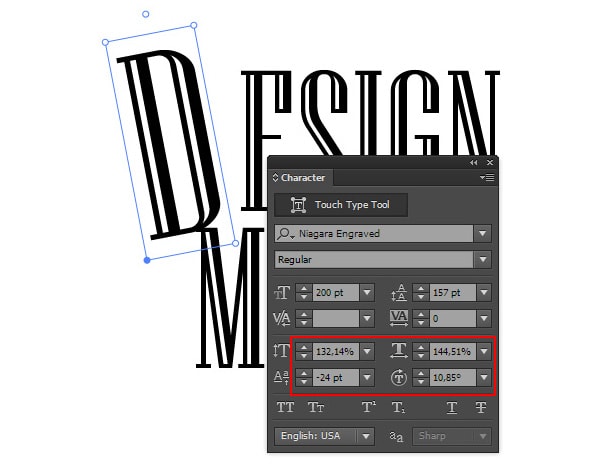
In addition, you will be able to transform the character with your fingers if you are using touch screens like a Wacom Cintiq, for example. After all the manipulations the text remains fully editable.
Images in brushes
Now we have the opportunity to use raster graphics like JPEG, PNG, TIFF or PSD files to create brushes in Adobe Illustrator. Before using it as a brush, raster image should be embedded into the current document. You can save the raster image as Art brushes, Pattern brushes and Scatter brushes.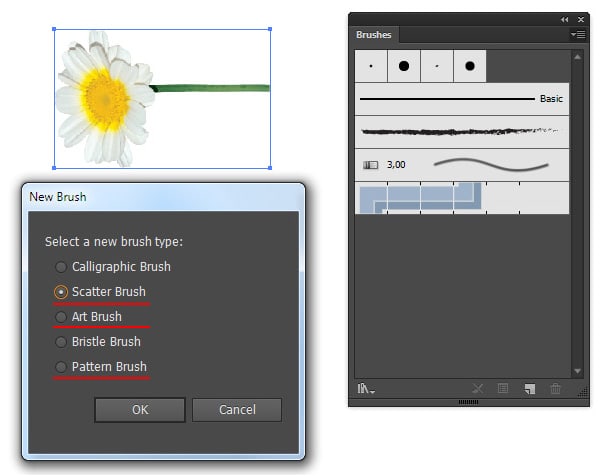
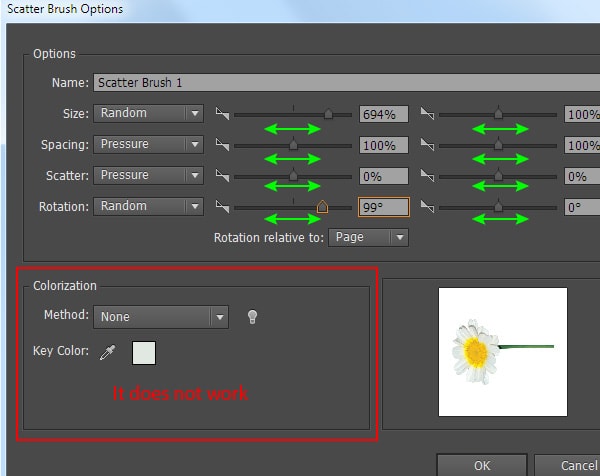
As well as for vector brush, you can manage raster brush parameters in the Brush Options dialog box. However Colorization option will not work in the case of creation of Image brushes.
After applying image brush to the path you can adjust the value of its elements by changing the stroke width in the Stroke panel.
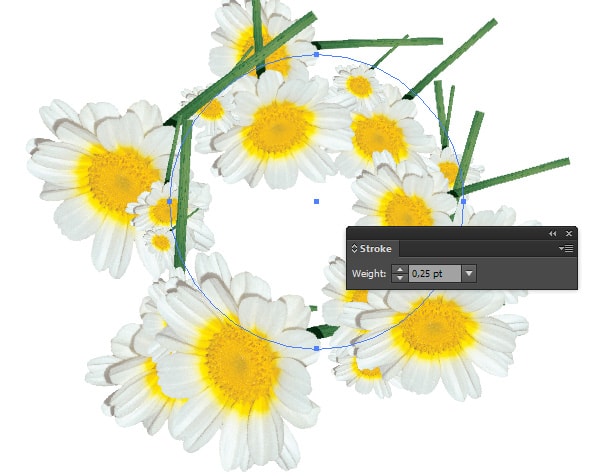
Of course, the new feature will expand our opportunities, but I personally would like to be able to use objects with gradient fills as brushes.
Auto corners for pattern brushes
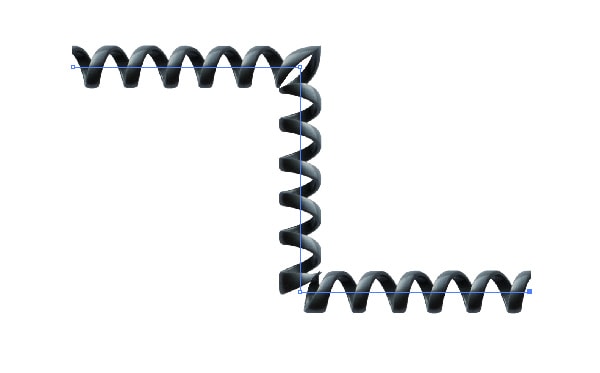
Creating a corner tile for pattern brush in Adobe Illustrator has always been not an easy task. Fortunately, new application release has a feature that allows you to automatically generate a corner tile. You can choose one of four types of corner tiles in the popup menu in the Pattern Brush Options dialog box.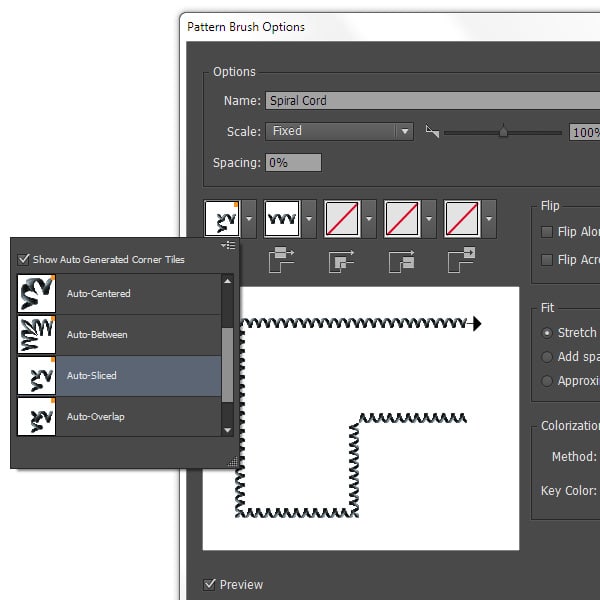
Font search and Faster type performance
Illustrator CC has an advanced filter in the Control and Character panels to find a suitable font. The search is performed by the style, font family, or any other part of a font name. We can see a preview of fonts, their types, and can also open the list of styles, such as bold, italic and so on for the selected font.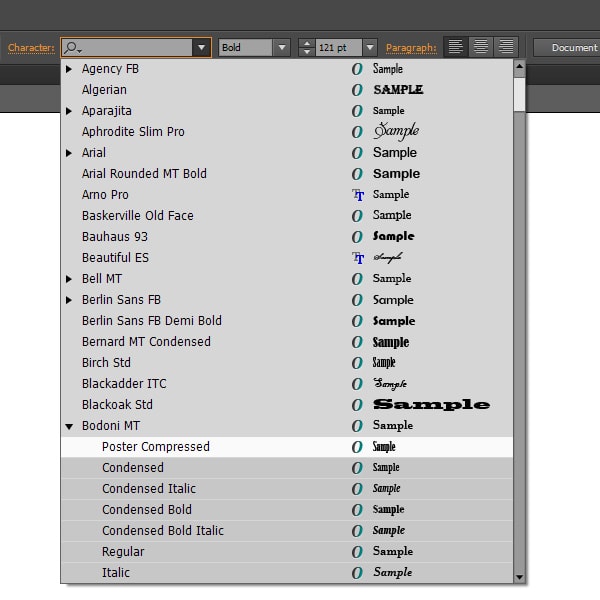
Undoubtedly, the new feature will speed up the work on font selection, which many designers will describe as tedious.
Multiple-file place
This feature gives us the ability to import multiple images at the same time and paste them into the document at the right places. To do this, go to File > Place … and select the images you would like to paste, and then click the Place button.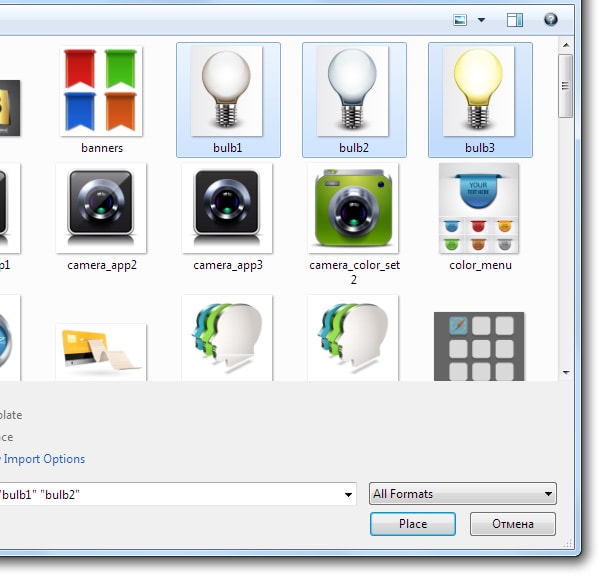
Now we have the pointer like in InDesign, and we are able to drag (or just click) and place images where we want on the page.
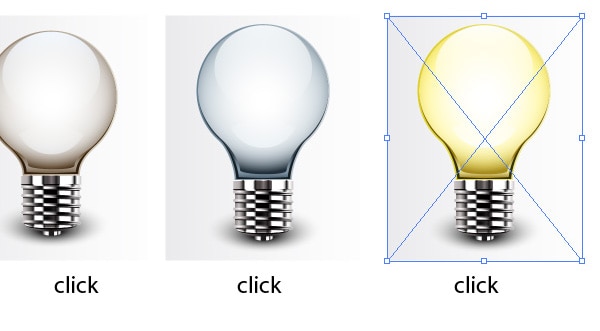
I think this feature will be useful for anyone who uses illustrator for layout.
CSS extraction
This feature allows you to export vector graphics into CSS. Select the elements, CSS of which you want to generate. Now open the CSS Properties panel (Window > CSS Properties), then press the Generate CSS button. As you can see, CSS of the selected items appears in the panel.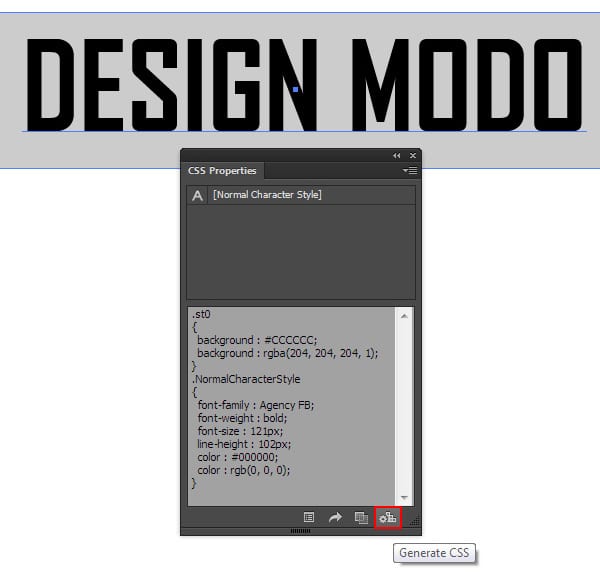
Now all you have to do is to copy the code and paste into the web page. This is how you can generate CSS not only of the individual elements, but of the whole page if you create a web design in Illustrator CC.
Area and point type conversion
Editable Text in Adobe Illustrator can be presented as area type and point type. Now we are able to switch between them by double-clicking on the marker to the right of bounding box. This marker becomes active, if you take the Selection Tool (V).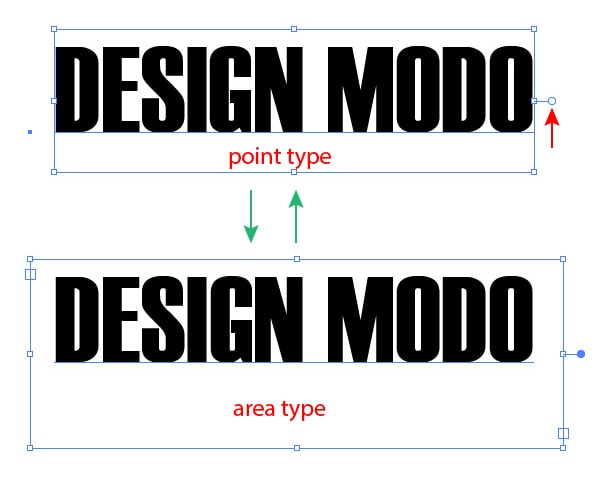
On-art Free Transform
Up till now the use of Free Transform Tool has been very uncomfortable. We had to follow a sequence of actions when handling this tool. Now we have the opportunity to transform objects in a more intuitive manner. After you select the Free Transform Tool, there appears a new widget, in which we can choose a type of transformation between the perspective distortion, free distortion, and constrained. Constrained is basically the same thing as if you were holding down the Shift key while making objects larger or smaller. Deformation control is done by moving the markers on the bounding box. Now we do not need to use a modifier Command / Ctrl while transforming objects.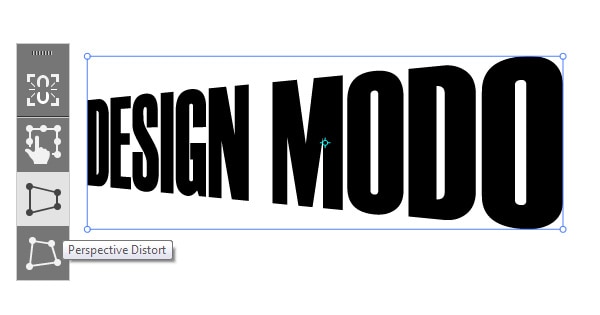
You can find a complete list of new features on the Adobe Illustrator / Features page.
| About The Author | ||||
|
Tuesday
15 25 Freshest Photoshop Text Effect Tutorials
Today we are about how Photoshop is to typography. Typography is a whole individual genre of art itself. And where we are discussing digital designing, typography leaps to a newer level of most profound visualization and style, which is near to no limits. And when we put together Photoshop and Typography, we actually put this art on unstoppable evolution. There is no boundary to what sort of text effects can be created with Photoshop. Here are the 25 freshest tutorials out there -- Enjoy
Create 3D Rubber and Glass Text in Photoshop CS6
In this tutorial, we will explain how to use the vector editing and 3D capabilities of Photoshop to create rubber and glass 3D text. In the process, we will show you how to create the materials, modify the lighting, render the scene, and finally, how to enhance the color of the final result. Let’s get started!
Create a Summer Inspired 3D Text Effect in Photoshop
In this tutorial, we will show you how to create a summer inspired 3D text effect. In the process, you will learn how to use Photoshop’s 3D features to create the basic text shape and then combine it with various images in order to achieve a desired result. Let’s get started!
How to Create Colorful Wooden 3D Text
In this tutorial, we will show you how to use Cinema 4D to create wooden 3D text and then how to use Photoshop to add the final touches. Let’s get started!
Create a Magma Hot Text Effect in Photoshop
In this tutorial, we will explain how to create a magma hot text effect using layer styles and textures in Photoshop. Let’s get started!
Create a Sparkling Diamond and Gold Text Effect Using Filter Forge and Photoshop
In this tutorial, we will explain how to use Filter Forge and Photoshop to create a glamorous, sparkling, diamond and gold text effect. Let’s get started!
Create Fresh Fruit 3D Text Effect in Photoshop
In this Photoshop tutorial, we will show you the process of creating fresh fruit 3D text effect in Photoshop. You will learn a few trick to render a nice and unique 3D text effect and apply various fruits around it.
Create Melted Metal Text Effect in Photoshop
In this tutorial,we will show you how you can create this melted metal text effect in Photoshop. We will mainly go through the use of layer blending options, image adjustments, and various filter effects which you use to produce this cool text effect.
Design Magical Fire Energy Text Effect in Photoshop
In this Photoshop tutorial,we will show you Design Magical Fire Energy Text Effect in Photoshop.
Create a Unique Rock Text with Space Background in Photoshop
In this Photoshop tutorial you will learn how to Create this Unique Rock Text with Space Background in Photoshop. I will show you an interesting way to place the rocks and join them together with simple line-drawing techniques.
Design a Hot Golden Text with Disintegration Effect in Photoshop
In this Photoshop tutorial you will learn how to design this Hot, Golden Text with Disintegration Effect in Photoshop. We will mainly use the selection tool and layer mask to perform some texturing for the letters, and use image adjustment tools to fine-tune the effect.
Create an Autumn-Themed 3D Text Effect With Photoshop CS6 Extended
In this tutorial, we will explain how to use those new features to create an autumn-themed 3D text effect. Let’s get started!
Create a Valentine’s Day-Inspired 3D Text Effect Using Filter Forge and Photoshop
In this tutorial, we will combine Filter Forge and Photoshop to create a wood textured 3D text effect with a simple red glass heart. Let’s get started!
Striped Road-Inspired Text Effect
in this tutorial will show you some tips on how to use the Pen Tool, along with some Brushes and Blend Modes, to create a striped road (street) inspired text effect.
Vintage Sparkly Sticker Inspired Text Effect
In this tutorial you will learn how to create a vintage sparkly sticker inspired text effect.
Decorated Wood Text Effect
In this tutorial you will learn how to create decorated wood text effect.
Delicious Bagels Text Effect
In this tutorial we will show you how to use the powerful Layer Styles’ capabilities in Photoshop, along with a couple of brushes and filters to create some delicious-looking bagels.
Colorful Sparkling Glass Text Effect
In this tutorial we will show you how to use basic Filters and simple Layer styles to create a bright colorful glass text effect.
Chocolate Text Effect In Photoshop For Valentine’s Day
In this tutorial you will learn how to create a Snow Heart effect using an image, and the magic of a custom brush.
Elegant Glossy Gold Text Effect
In this tutorial we will show you an easy way to create a luxurious super glossy golden text effect using layer styles, a filter, and a simple brush.
Simple Bokeh Text Effect
In this tutorial is inspired by this technique, we and will show you a super easy way to create a dazzling beautiful bokeh text effect, using a simple brush and a layer effect.
Xcom Text Effect In Photoshop
In this tutorial you will learn how to create a xcom text effect in photoshop.
3D Bold Text Effect
In this tutorial will explain how to create a bold bright-textured slick text effect in Photoshop CS6. A simple pattern will be used to create the bump map, while some other material settings will be changed to create the final appearance. Lighting, Environment, and Image Based Light settings will also be modified to complete the scene and create the final result.
Dot-Cutout Paper Text Effect
In this tutorial you will learn how to create a colorful dot-cutout paper text effect, by rasterizing the type layers, then creating and stroking work paths with a modified round brush. It will also explain the process of adding a couple of adjustment layers to modify the coloring of the final result.
Colorful Futuristic Text Effect
In this tutorial we will learn how to create a colorful futuristic looking text effect, using a couple of Layer Styles for multiple layers, and a simple brush.
Create a Computer Chip Text Effect in Photoshop
In this tutorial, you will learn how to create a Computer Chip Text Effect. We’ll use basic shapes, Layer Styles, Layers Masks and a few Filters to create this cool text effect to give a technology feel on your texts.
| About The Author | ||||
|
Thursday
10 Amazing tips to make a good company logo

Choosing the right kind of logo for your business is an integral part of building a strong business or organisation and is essential in creating a strong brand identity.
Well constructed and thought out logos create an excellent base for brand recognition.The foundations in creating a brand should come from the values, beliefs and functions of the business. A logo is the visual representation of these values, beliefs and functions as this is generally the first point of recognition for your clients.
A design team may approach your logo with several different kinds of logos in mind. These can be loosely grouped into the following three categories:
1. Word mark
Generally speaking this is the most preferred option for a logo, especially if your brand isn’t well established. Word marks are uniquely styled logos, which are exclusively typographic and spell the brand name or company out.Examples of this type of logo include Coca Cola, Sony and FedEx.

2. Symbol/ Icon (Pictorial/Abstract/Letter mark)
A symbol, whether it’s pictorial, abstract or a letter mark, creates an easily recognisable motif. Usually, the ideas behind the logo are complex, but the logo represents the brand in its simplest form.Examples of recognisable pictorial symbol logos include Apple, WWF and Penguin Books.
 Abstract symbol logo designs are usually influenced by nonfigurative influences. Examples include Nike, BP and Adidas
 Letter marks are probably the most simple and easily memorable
symbolic logos as generally there isn’t anything arbitrary about the
design. These types of logos are usually favoured over other types of
symbolic logo as they can easily graphically illustrate the company
better than the full name, especially if the company name is difficult
to pronounce or if it’s not very distinct.
Letter marks are probably the most simple and easily memorable
symbolic logos as generally there isn’t anything arbitrary about the
design. These types of logos are usually favoured over other types of
symbolic logo as they can easily graphically illustrate the company
better than the full name, especially if the company name is difficult
to pronounce or if it’s not very distinct.Examples include McDonalds, Hewlett-Packard and Calvin Klein.

3. Combination Mark (Traditional/ Emblem)
A traditional combination mark occurs when a word mark is coupled with a symbol. Logos that use combination marks are commonly flexible and aid towards a more interesting brand identity. Examples include Jaguar, British Gas and National Trust.
Emblem combination marks are similar to traditional combination marks. However, they rely heavily on the typography within the encasing emblem since without the typography the logo is generally unrecogniseable. Examples include UPS, Lego and Harley Davidson.

There are a lot of different choices that need to be made in order to help build a strong foundation for your brand identity. Ultimately, a good designer will work with you to understand your company and will choose the appropriate logotype based on the values, beliefs and functions of your business.
| About The Author | ||||
|


